Find Out More Information Regarding Electric Floor Heating Systems
Make sure you get the best possible in-floor heating system. Installing electric systems is typically less difficult and more affordable.
The Advantages of Having Heat on the Floor
You won’t look back after you take off your fluffy slippers and experience the ease of walking barefoot on the warm floor. There are additional advantages to having heated floors, which are also sometimes referred to as radiant floors or a radiant heating system.
They prevent the floors in the entryway and bathroom from becoming wet and provide space heating in otherwise chilly areas. Even if you lower the temperature on the temperature controller for your home’s central heating system, you can maintain the desired temperature in certain rooms.
In this piece, we’ll take you through the different kinds of floor heating systems that are available on the market today and show you how to install them in your own home. We will explain the benefits and drawbacks, as well as the most effective installation methods.
This will assist you in determining whether you should tackle the project on your own or hire an expert. It is common practice to install these heating systems under tiles in bathrooms; however, it is important to keep in mind that it is possible to add heat under any kind of flooring material.
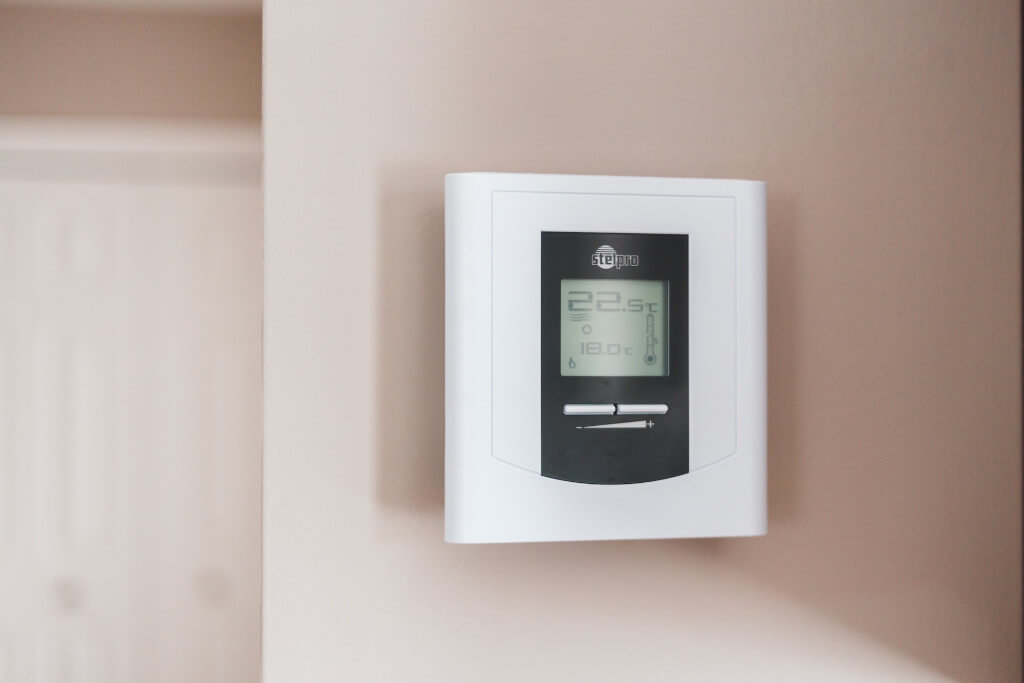
Electric Systems are Easily Accessible and Reasonably Priced
Electric floor systems function in the same way as an electric duvet: electricity is passed through a cable referred to as “resistance,” which generates heat. Due to the relatively high cost of electricity, only a small percentage of homes are completely heated by electric in-floor systems.
On the other hand, these systems are fantastic for making even the coldest floors more bearable to walk on. In addition to this, they bring the temperature up a few degrees in a room that would otherwise be quite cool. On a chilly day, the possibility of stepping out of the bath on a warm floor in the bathroom makes for a more inviting experience.
A heating cable, a thermostat, and a temperature controller are the three elements that make up an electric system. The temperature of the floor, and not the room itself, is what the thermostat determines when to turn the heat on and off. The thermostat is linked to the electricity supply of the home.
Along with the cable, the thermostat receives information from a sensor that is installed on the floor. This information indicates how warm the floor is. (The majority of people have a temperature preference for a floor that ranges from 80 to 90 degrees Fahrenheit.) The cable is typically sold separately from the thermostat and sensor, which are both contained within the same packaging. It is not recommended to use a cable made by a different manufacturer with a thermostat made by a different manufacturer.
The electrical connections call for only fundamental knowledge of wiring, and installing the floor cable is a straightforward do-it-yourself endeavor. When it comes to projects of a more modest scale, such as heating a chilly bathroom or heating the surface of the kitchen, an electric system is typically the best option because of how simple the installation process is and how much cheaper the materials are. The addition of electric heat to a standard bathroom during the installation of a new floor will only increase the total cost of the project by R 3500 to R 5000. In most cases, the operating expenses amount to approximately a half-cent per square meter per day.
“Fishing” electrical cable through finished walls to reach the thermostat and cable is frequently the most difficult obstacle to overcome. Because these systems typically consume only 10 to 15 watts of power per meter, it is typically possible to connect them to a circuit that is already installed to heat a pretty standard bathroom. You may need to hire an electrician to connect the new circuit at the main panel, which will cost about R 2000, and you may need to install a brand-new cable to the panelboard if the room is larger.
If you want the heat to rise, install fiberglass insulation between the floor boards of a wood-framed floor before you install a heating system on top of the floor. Insulation is not necessary for the system to function properly; however, adding insulation will make it more energy efficient. Check the instructions provided by the producer before you implement an electric system above a concrete floor. The instructions may stipulate that a sheet of insulating foam must be installed over the concrete before the installation of the heating cable.
A helpful hint is to calculate the square meterage of a room by including only the areas in which people can walk. It is not cost-effective to heat the floor that is located under the household items or behind the toilet.
Electrical System Number One: Slack Cables
Just like any other type of wire, the cable is delivered on a spool. The use of a loose cable to heat a floor is by far the most affordable method, and it is equally efficient compared to other systems. The installation process for loose cable can be time-consuming because first the cable must be arranged in a serpentine pattern, then it must be secured with a large amount of hot adhesive or staples, and finally, the cable must be “embedded.”
The majority of loose cable systems have end pathways that guide spacing between the cables. If you want the floor to heat up more quickly and get to a higher temperature, you can place the cables closer together. If you want to use less cable, you can space them further apart. The manufacturers offer a variety of cable lengths that are tailored to the total square footage of the floor. It is not possible to join different sections of cable together to provide service to a larger room or to fix a broken cable. To prevent the cable from moving or floating while it is being embedded, secure it with screws every six inches along its length.
Caution: When using your trowel, make sure to work carefully. If you cut the cable, the whole system will be rendered inoperable.
There are two different approaches to embedding cable: It is possible to place the cable over the tile backer panel and then wrap it with “thin-set,” which is the terminology for the mortar adhesive that is used for tile. Because the thin-set contracts as it dries, you might need to apply two layers after the first one has been set to get it to the desired level. However, it can be difficult to use a thin-set to create a surface that is perfectly flat and smooth.
It is possible to make it smooth enough to be used for ceramic tile or a floating floor, but it is unlikely that you will be able to make it smooth enough for vinyl flooring. Installing the cable without using a backer board and pouring on a “self-leveling compound,” also known as SLC, allows for a faster and smoother surface. A cement-based powder known as SLC is poured over cables after being combined with water and given a stir.
After a few hours, it will be as hard as a rock. Plastic laths should be used to reinforce the SLC instead of metal laths because the latter can snip the cable. Including the cost of the lath, the cost of covering your floor with a layer of SLC that is half an inch thick is approximately two dollars per square foot. After that, you are free to install a floating floor, tile, carpet, or vinyl directly on top of the SLC.
System 2 of Electric Heating: Mesh Mats
The cable arrives in a plastic net that has already been woven into place. Installing the cable that has been pre-positioned takes significantly less time than installing a loose cable. To attach the mesh to the floor, you simply use staples or hot glue. After that, you integrate the cable and mesh just like you would with loose cable.
There is a wide variety of sizes and shapes of mats to choose from. You can cover your floor in the mesh by cutting it into sections and fitting those sections into corners. However, the cable itself cannot be severed or spliced in any way. The application of a thin-set straight over the mesh and the subsequent tiling can be one method that is recommended by some manufacturers.
But this presents a challenge. Similar to how it is done with loose wire, the majority of tile setters favor embedding the mesh first through thin-set or SLC. Even though the guidelines suggest less frequent fastening, you should secure the mesh to the floor at regular intervals of six inches because it tends to “float” as you embed it. After it has been embedded, you can then lay tile, carpet, vinyl, or even a floating floor on top of it.
Third Type of the Electric System: Solid Mats
Although solid mats are typically the most expensive form of the electric system, they are also the most straightforward to set up. The cable is sheathed in a synthetic fabric, plastic sheeting, or metal foil to ensure complete protection. The most significant benefit is that it does not need to be embedded, as is the case with loose cables or mesh mats. In some configurations, the mat is placed atop a layer of thin-set and merely leveled out.
After that, you lay down ceramic or stone tile in the traditional manner using an additional thin set that you spread over the mat first. The installation of certain solid mat systems is made even simpler by the fact that all that is required is to roll out the mats, clip them together, and you’re done. After that, you can install a floating floor made of wood or laminate directly on top of it.
You can purchase mats in a variety of sizes, and you can even combine mats of various sizes to create a custom fit for your space. You can heat the floor from underneath with certain mats because they are sized to fit between the joists. This is a significant benefit if you don’t want to replace the current floor in your home. However, you should never install electric heat beneath a subfloor except if the system was designed to be installed in that manner in the first place.